Getting started
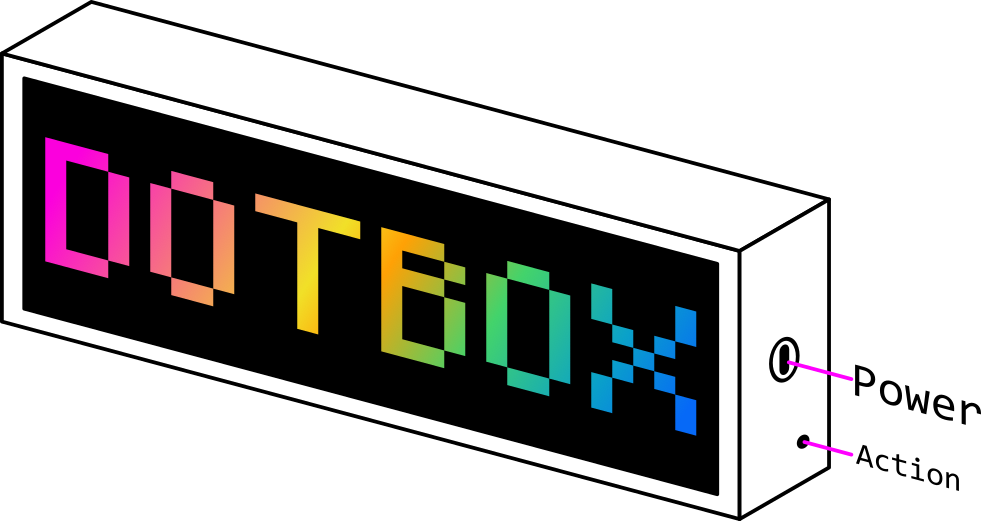
First thing to do is plug a USB-C power supply into the power socket on the side of the Dotbox. This must be a proper USB-C PD-capable power supply that can deliver a stable, high current (at least a couple of amps). Cheap “phone-style” chargers or older 5V/1A bricks often won’t negotiate enough power, and the device simply won’t boot.
You should also use a good-quality USB-C cable – some cables only support charging at very low currents or don’t implement the correct USB-C wiring. A bad cable will cause brown-outs, flickering, or a completely dead device.
If everything is fine, you’ll see the Dotbox logo.
Joining the WiFi
When the Dotbox first boots, it will ask you to join a WiFi network to begin setup. The easiest way to do this is with your phone. In your list of available WiFi networks you’ll see something like Dotbox-XXXX (with four random numbers). Connect to that network, and the Dotbox setup page will appear automatically.
On iOS (iPhone/iPad):
- Open Settings → Wi-Fi
- Wait a moment for the list to refresh
- Look for Dotbox-XXXX and tap it
- The setup page should pop up automatically (like a hotel/café login page)
- If the portal doesn’t open automatically visit:
http://10.0.0.1on the device connected to the Dotbox WiFi
- If the portal doesn’t open automatically visit:
On Android:
- Open Settings → Network & Internet → Wi-Fi (wording may vary slightly)
- Refresh the list if needed
- Tap Dotbox-XXXX
- A browser window or setup panel will open automatically
- If the portal doesn’t open automatically visit:
http://10.0.0.1on the device connected to the Dotbox WiFi
- If the portal doesn’t open automatically visit:
From there:
- Tap Configure WiFi.
- Pick the WiFi network you want your Dotbox to join.
- Enter the password for that network.
- Tap Save and give the Dotbox up to 30 seconds to connect.
Once the Dotbox has successfully joined your home WiFi you will be able to add it to your account.
Adding your Dotbox to your account
For the following steps you’ll need to create and log in to your account over on the Dotbox Dashboard.
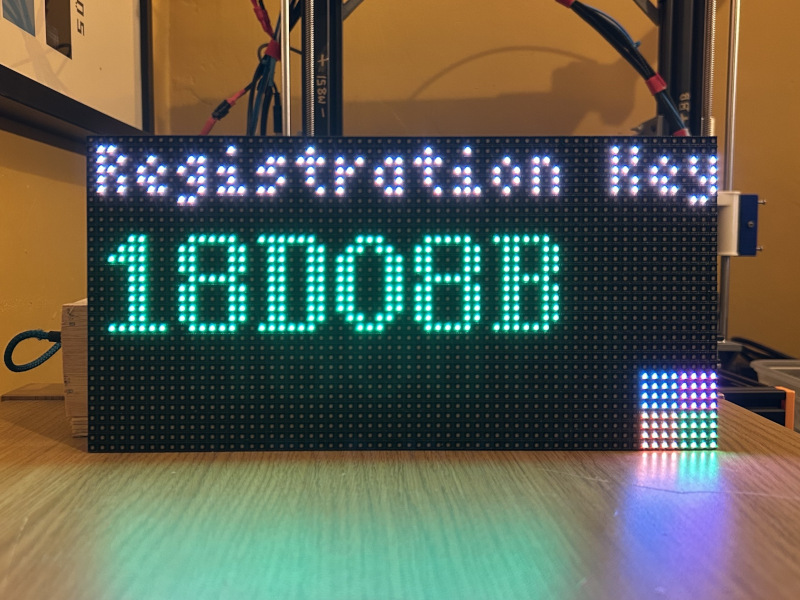
After you first connect your Dotbox to Wi-Fi, it will display a 6-character pairing code. Head into the Add Device page and type in that code and hit the Add Device button.

You will then be able to start configuring your new Dotbox!
Setting up your Dotbox
Once you’ve added your Dotbox to your account you can start playing around. Once you’re finished setting it up hit Save and the updated settings will be sent to your connected device.
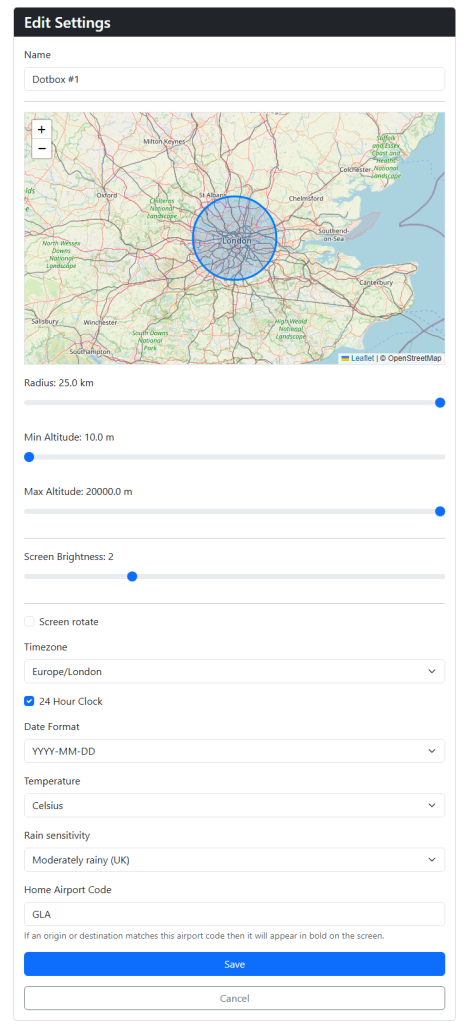
Name
Give your Dotbox a custom name. Very handy if you’ve multiple devices.
Location and Radius
Move the map until the circle sits over the area you want to keep an eye on. Adjust the radius slider below the map to make the monitored region larger or smaller.
Minimum and Maximum Altitude
The lowest possible setting for minimum altitude is a little above the ground to prevent tracking planes which are just sitting on the runway. This setting can be adjust up as required
The maximum altitude can be used to filter out planes which are so high you’re not that interested in them. Useful if you live near an airport and only want planes coming in for landing rather than flying at maximum altitude overhead.
Screen Brightness
The default screen brightness can be set via the Dotbox’s settings. It can also be cycled from off to full brightness by tapping the Action button whilst the device is running.
Screen Rotate
If you’d prefer your power cord to be coming out the other side of the Dotbox select Screen Rotate and the image will be rotated 180°.
Date Format
Select between:
- Year-Month-Day
- Day-Month-Year
- Month-Day-Year
Temperature and Rain Sensitivity
Temperature can be in Celsius or Fahrenheit.
The rain-graph can be configured to be more or less sensitive to the amount of rain you’re likely to experience. For example if you live somewhere extremely dry than you’ll want to select “Not very rainy” so the graph will show large enough bars for small amounts of rain.
Home Airport Code
To show a particular airport code in BOLD enter it in this field. For example if you live near Glasgow airport entering GLA in here will highlight this when its a flight’s origin or destination. Handy if you want to quickly tell if something is landing or taking off nearby.
If you see ??? appear for a plane’s origin or destination it’s because the scheduling information for this flight was not available. This is common for emergency services, military flights, private charters, positioning flights, or aircraft that haven’t filed a public schedule.
Resetting and Updating the Dotbox
There are two ways to enter the Admin menu:
- Whilst the Dotbox is running hold down the Action button for 2 seconds, release, and immediately hold down again until the Admin menu loads.
- Unplug the device. Press and hold the Action button. Plug the Dotbox back in. Continue to hold the Action button for 3 seconds till the Admin menu loads.
To navigate the Admin menu:
- Short button presses will change the selected option
- Long button presses will choose an option
Updates
If you want to update the device’s software you must:
- First have previously set up the Wi-Fi connection so that it can access the internet
- Select the Update menu in the Admin menu
- Confirm that you want to perform an Update
- The device will check if a new firmware is available, fetch any updates, perform and installation, confirm everything is as expected. Please don’t disturb the device during this process
- Once the update is complete the Dotbox will automatically reboot.
Resetting
If you’d like to change your Wi-Fi details or move the device to a new account then a Reset is required. You will need to:
- Select the Reset menu in the Admin menu
- Confirm the Reset
- Once complete the device will reboot and the device will restart automatically
- You will need to setup the device Wi-Fi again
- If you’d like to use this device with a previously configured Dotbox go to your Dotbox: Devices page and hit Re-Pair for the desired device
- Use the Key shown on the Dotbox to Re-Pair the device